Hello! Welcome to Keeping Up with the Joneses. Thanks for stopping by! We're a young couple living in the East Arkansas/Memphis area otherwise known as The Delta, with a love for family, friends, faith and food.

We believe that some of the best memories are created at home around the dinner table, and when entertaining those you love. This little blog is where I share recipes, wine, our home and our life. Enjoy! -Kendall

What You'll Find:

I love to try new recipes. In fact, I rarely make the same thing twice. I'm a bona-fide cookbook collector, Pinterest addict and magazine aficionado. On the blog, you'll see what I've got cooking.

I love wine, y'all, so from time to time I feature bottles I've loved. Crafts and decorating our little house are passions of mine, so you may see some of that. Thanks for stopping by!

New Kitchen Organization & DIY Magnetic Spice Wall

| 30 responses. Leave a Comment!
I have declared 2013 the year of organization. By nature, I'm a very neat and tidy person, but behind cabinets and in closets, things can be chaotic! Most of the storage space in our house is maxed out and at least one area drives me crazy on daily basis just trying to locate something. So, I'm taking it space by space, carefully planning it out and getting completely organized! Rome wasn't built in a day, so patience has been key!

First up was my kitchen pantry, spices and baking cabinet. I wish I had taken 'before' pictures of these spaces. Our pantry is not very big to begin with, and being that I love to cook, I accumulate lots of ingredients. But, it was no man's land in there. I had no idea what was in the back, so I ended up with two of things easily. We also live in a field, so over the holidays we had a little mouse trouble. One literally came running out at me when I started to clean it out!! If there had been a video of my reaction, it would surely be a YouTube hit. Talk about having the willies after that! My spice/baking cabinet was also overflowing. Spices literally would eject themselves at me when I opened it. Thus, a big makeover was in order.

Note: this was not done in just one weekend. I spread it out over a few! ;)


First step was to clear everything out and throw old stuff away. Next, I went to Fred's (it's a local dollar-store chain in the Mid-South) and bought all of these containers. It was so cheap!! There is no reason why you should spend tons of money at Bed Bath & Beyond or Container Store. Dollar stores have lots of organizational products.


IMG_6734


Next, I made a plan for what made sense grouped together and filled up the containers. The large white labels came from Michael's (Gartner Studios brand), but I may have to change them eventually because I've found they aren't sticking that well.

IMG_6729


These large glass jars hold things like chocolate chips and candy bars (things I use for baking). The smaller screw-top jars all hold rice (there are three lined up there).

IMG_6731


These two containers hold smaller things that were easily lost in larger baskets.

IMG_6726


On the next shelf down, I used two sets of glass canisters and staggered them back. These all hold pastas and grains. In the middle, I used stackable tupperware for things like panko, breadcrumbs, grits, oats, flaxseed, etc.

IMG_6728


On the left, I placed two small baskets for misc. items like tortillas, special rice mixes, dried fruits, etc.

IMG_6716


On the next shelf down, I used these cool plastic nesting tubs from Fred's. It was so cheap and had 7 sizes of containers - perfect for various snacks. Spaghetti and lasagna noodles are in a container I happened to already have.

IMG_6718


At the bottom, I used two large baskets to collect more miscellaneous stuff (extra jars of mayo, chicken broth cartons, etc.) and the other holds chips. It is really nice to be able to slide one of these out versus digging through a mountain of stuff crammed on one shelf.
On the floor, I added a two-drawer stacking bin for holding plastic bags and kitchen papers. On the right I store my crock-pot and panini grill.

It's a happy pantry. But, my favorite thing is the new spice wall on the back of the door!

IMG_6725


I needed to maximize my space, so I started doing research on magnetic spice solutions. Tins that are already magnetized are pricey, and I found it would be pretty simple to add magnets myself. I love the way it turned out!

IMG_6706


There are 60 tins on my wall, and only 3 are empty for future spices! I cannot believe I had so many crammed into a cabinet.

IMG_6707


Of course, they are all alphabetized.

IMG_6710

IMG_6713


In addition to traditional spices, I added rubs and mixes towards the bottom.


Here's how we did it:

IMG_6714


Supplies:
1 Piece of sheet metal from Lowe's or Home Depot - Be sure to get one thick enough to hold a magnet. Either take something magnetic with you, or test using the magnets in their store. We almost checked out with a piece that was too thin to hold a magnet! Our pantry door is not a standard-sized door, so we had a local metal-works shop cut ours down. If you have a standard door or wall space, the pieces of metal they sell at hardware stores won't likely need resizing. Keith was able to simply screw this into the door.

Tins - I ordered 60 4 oz. square tins from Specialty Bottle. I had the choice between round or square and just thought the square was cool, but either would look great. One downside to square I've recently noticed is that it's easier to tell if they are crooked, but that's just my OCD kickin' in.

Magnets - You MUST use Neodymium magnets, otherwise they will not be strong enough to hold the tins and you will risk them falling off and spices going everywhere. I ordered the D901 version from K&J Magnets. I ordered about a dozen extra magnets. If you aren't careful, these are so strong and can break trying to fling themselves onto metal surfaces. I broke 2 that way. I also liked having extra so I could put 2 magnets on the back of some of the tins to hold 'heavier' spices.

Epoxy - To adhere the magnets to the tins, use epoxy from the hardware store. This is the product we used. It didn't require mixing and came with an easy tip dispenser.

Sandpaper - 100 grit sandpaper - a small piece will do.

Damp Paper Towel

Tweezers

Labels of your choice - I'll share details of mine below


IMG_6719


How to:
  • To adhere the magnets to the tins, you need to first rough the back up with sandpaper. Otherwise, the epoxy won't adhere. 
  • Once you've sanded all of them, use a slightly damp paper towel to wipe the dust off. Allow the tins to dry; you don't want any moisture.
  • Epoxy sets up really quickly, so you want to be ready with the magnets before adding the glue. We spread the magnets out all over the table (far enough apart to not magnetize to each other) so that it would be easy to grab with the tweezers.
  • Keith placed a small dot on the center of each tin, and I followed behind placing magnets on the back by using tweezers to pick them up. The magnets will automatically be drawn to the tins, so make sure your aim is good. It'll jump right off your tweezers onto the tin. NOTE: when I say a small dot of epoxy, I mean it - it doesn't take much!
  • Allow the tins to dry overnight before filling.
  • Once full and labeled, place them on the spice wall and see if any slide. I found that some of my spices were heavier than others - such as poppyseed and sesame seed, and they had a tendency to not stay in place as well. So, I added a second magnet to the back of those - see below.

IMG_6759


Tips:
  • When planning out your wall, be sure to allow for enough space around each tin. You'll want to be able to easily fit your hand around them, so that you...
  • .....don't grab the tins by the lid to pull them off. This seems like an obvious tip, but just be careful. I've found that it's not natural for me to reach for them by the lid, I tend to grab them with a 'full grip' around it so I haven't had a problem. Just remember not to pull them off by the lid. Otherwise, spice is getting all over you, the floor, the other tins, your kitchen, etc.
  • You could purchase screw-top tins if you prefer, but they are pricier. I opted to risk it and haven't had any problems so far.
  • If you are worried about expiration dates and not knowing when things expire, just add a sticker to the back and write the expiry date in pencil every time you refill! I was shocked at how old some of my spices where when I did this clean out.

IMG_6720


For the labels, I enlisted the help of my friend Michelle at work to design a simple style. She created a Word doc for me so that I could easily type the labels in myself (handy for when I have future spice needs). I bought 8.5x11 sheets of label paper, and used my 1.5 inch circle punch to punch them out.

If you are interested in this template, shoot me an email. I'd be happy to share! 

IMG_6723


To peel the label backing off, I found that my fingernails would scratch the red print on the front, so I used a straight pin to find the seam, and then peeled the backing off.

Of course, you could use an Avery label that was already sized to the dimensions that you want, but I was unable to find any at my local store, so I improvised!

Tip: Check out Martha Stewart's line for Staples - she's got lots of cute stuff.

IMG_6755


I love having my spices in tins now because it's so easy to dip a tablespoon measurement in. That was always impossible with store-bought spice containers.

IMG_6764


Is it sturdy? Heck yes. Keith was skeptical, but I knew I had done my research and this would work. To test, we filled several spice tins with heavy batteries and slammed the door a few times really hard before we put spices in. Knowing that we'll never have anything that heavy in the tins (or be so abusive to our door, we felt safe!

IMG_6737


I also organized the cabinet where the 60 spices where originally located. I am still in disbelief that I crammed as much in here as I did, but I love it so much more now! It's sort-of become my baking cabinet.

I had Keith adjust the spacing on the shelves to accommodate the various heights. The top shelf is pretty narrow, but it works for what I've got up there.

IMG_6739


On the top shelf, I used a couple of lock canisters for melting chocolates and chips. I had SO many extra glass spice bottles that I saved about 20 and washed the labels off. They're perfect for sprinkles! Everything also looks better when you remove it from the packaging it came in. Consistency in containers looks really pretty! It's more 'merchandised' like a store, which I love.

IMG_6740


Also on the top shelf is a large tin for misc. piping tips and bags. I also stacked up all of my cupcake liners and placed them here. There are 6 total stacks. I think I have a problem. Better get to baking....

IMG_6741


On the middle shelf, I re-purposed a spinning spice rack that was on the counter. I was able to wash the spice names off the lids and filled these with sprinkles using a funnel. Maybe now that I can see what I have, I'll actually bake something with sprinkles! Next to them, I used more lock canisters for baking basics.

IMG_6742


It's like a sprinkle merry go round!

IMG_6744


These canisters are used all of the time, so spreading them out a bit more makes them easier to get to.

IMG_6746


On the bottom shelf, I ordered 10 of these 5.1" tea tins to store things that take up a bit more space: salt, baking soda, baking powder, cocoa, meringue powder, cornstarch, cinnamon sticks, food coloring, etc.

IMG_6747


IMG_6754


These tea tins are really nice to put a measuring cup down in.

IMG_6749


I also ordered 10 8 oz square tins for spices that come in a larger quantity than the small ones on the door would hold, like garlic salt, garlic powder, barbecue seasoning, etc. I also lined up my vanilla extracts on the side and filled a few extra spice jars with toothpicks.


So, that's it! One project down, many more to go. I will say that this was not necessarily a cheap re-organization. The containers for the pantry were inexpensive, but the tins and magnets were more of an investment. Luckily, I know I can move that with me to any house. And, all of this should last me a lifetime anyway! 

Thanks for stopping by! Please let me know if this inspires you to do something similar! 

PS - I'm linking this up on Delightful Order , Organize and Decorate Everything, i Heart Organizing and Kelly's Korner


Ham, Swiss and Cheddar Quiche (Keith's Favorite!)

| 3 responses. Leave a Comment!
Breakfast foods are a favorite genre of mine. And quiche tops the list, right along with eggs benedict. This particular quiche is an old Southern Living recipe pulled from the pages of my mother's Five-Star Recipe Collection. She had these huge white binders and would periodically receive new pages to put in the books. I remember being so excited to see what new treats mom was going to make for us with her recipes.


photo

My mom recently made this quiche for Keith and I on a Saturday morning when we were visiting my parents. She is a great hostess and almost always makes us a yummy breakfast when we stay. Keith declared this his favorite quiche, so I made it again on Christmas morning, and again last weekend.  The ingredients list is short so the items could easily be kept on hand.


IMG_6634

Ham, Swiss and Cheddar Quiche  
click here for printer-friendly recipe

Ingredients:
1 package of refrigerated pie crusts (you only need one pie crust, but I like to use the second one for decorative border)
1/2 cup (2 ounces) shredded Swiss cheese
1 cup (4 ounces) shredded sharp Cheddar cheese, divided
2 Tbsp all-purpose flour, divided
1/2 cup diced cooked ham
2 Tbsp honey mustard
5 eggs, beaten
1 1/4 cups half-and-half
1/4 cup chopped green onions
1/4 tsp salt

Preheat oven to 400.  Line a pie dish with the pie crust. If desired, use extra dough to create a decorative edge. I used a knife to cut even, thin strips, braided them, pressed the edges together and sealed by brushing on a bit of water. I pressed the edges to the pie crust to secure, and every few inches I pressed the braid into the pie crust to make sure it would stay put.
Prick bottom and sides of pastry with a fork. Bake for 5 minutes, remove from oven and gently prick with a fork again. Bake an additional 5 minutes. Reduce oven to 350.

Combine Swiss cheese, 1/2 cup Cheddar cheese, and 1 Tbsp flour, toss gently. Sprinkle evenly in pastry shell. Combine ham and honey mustard, toss gently to coat. Spoon ham mixture over cheese.

Combine eggs, half-and-half, green onions, remaining 1 Tbsp flour, and salt; stir well. Pour mixture into pastry shell; top with remaining 1/2 cup Cheddar cheese. 

Bake at 350 for 40 to 45 minutes or until set.  If you have a pie crust shield, add about halfway through. Let stand 10 minutes before serving.


IMG_6632

Happy Monday!!

Wine Friday: Pinot Noir

| 1 responses. Leave a Comment!
Happy Friday!! This was a short week for me so the weekend came sooner than it usually does. I could get used to that! I'm excited to do my second Wine Friday of 2013. 2/4 Friday's isn't so bad! I'm makin' a come back...


wine fridays

Today, I'm featuring my FIRST Pinot Noir of my Wine Friday series. Why? Because I've only met a few Pinot Noirs I ever liked. I'm more a full-bodied fan. But, this one is a gem. It recently converted me from a pinot-hater, to an ok-I-could-get-used-to-pinots person.


bottleshot-cr-pn-2011

The Crusher Pinot Noir

Year: 2010 or 2011

Origin: California

Average Price: $13
About the wine: It's got a little bit of a cranberry, plum thing going on that made me a happy girl. This is a great red when you're looking for something a little lighter. I'll definitely be buying this one again the closer we get to summer. The winery where this comes from also produces other favorites of mine such as Pepperwood Grove, Smoking Loon, The Other Guys, Moobuzz and many more I've featured on this blog.

Keith and I are planning a trip to Napa/Sonoma this year and this place may have to be on my list!

Happy weekend :)

Valentine's Day Decor and DIY Cupid Arrows

Hi there! I'm so excited to share these pictures with you of my new V-day decor. I've had a wonderful long weekend and had plenty of time to get my craft on. I hadn't planned on 'decorating' for Valentine's Day, but I happened to be in a brand new Michael's craft store on Saturday and just went crazy. I quickly did a little Pinterest search while standing in the aisles just to get my creative juices flowing. With a few random ideas in hand, I just grabbed materials that I liked. I had so much fun putting it all together back at home. It's amazing what a gal can accomplish with a heart-shaped paper puncher and cute scrapbook paper!

Also, while out shopping, Keith and I picked up a few new pieces for our house at an antique mall. For Memphians, it was Sheffield's in Collierville, which is seriously amazing. We were on a mission for stuff for the mantel, and came away with even more than planned - bonus!

Ok, here we go:


IMG_6637


This metal sign is hanging on our front porch in lieu of a wreath.  It's pretty big and I love it! This comes from the same lady that I have all of my other seasonal signs from. Last year she gave me a bunch for free if I would post about her on my website, but she still hasn't set up her Facebook page or website,  so I still can't send you guys anywhere...and I hate it! I always get so many questions about where these come from!

IMG_6638


In the entry, we have added a new rustic metal window type piece to replace the pear painting. I was growing tired of it as it was one of the first items I purchased before really discovering my 'style'. This new piece was a total steal at the local antique mall! Hanging this item is currently on Dr. Jones to-do list. But, our doorbell sound box thingy is right above where this is resting. No clue why it was put in such an odd place, but it's time to have that moved!

IMG_6639


I added a little heart garland to this just to make it festive. Using my Martha Stewart heart punch, I cropped out lots of hearts in a variety of patterns from one of those mini scrapbook paper 'stacks'. I used double-sided scrapbook runner to adhere, but before sticking the front and back of each heart together, I ran the bakers twine through the center.

IMG_6641


I added a little love flair to our bar tray. I found some leftover pink and red napkins and punched those in the corner, and created a tag for the decanter.

IMG_6642


No. 9 - get it? Love Potion no. 9. Duh! Michael's had a bag of mixed tags that I grabbed. I wrote the 'no.' in sharpie and painted the black 9 on using a stencil.

IMG_6644


In the Dining Room, I re-purposed items on hand. I layered a couple of runners and moved some of my new lanterns from the mantel onto the table. I also got a little crazy with my heart puncher here, too.

IMG_6645

IMG_6650


I dressed up a simple grapevine wreath for the guest bathroom. There's not a window in there, so I moved it outside just for photo purposes. I used more of the tags, stenciled the letters on, and used these adorable mini clothespins (also from Michael's) to attached it to some twine. The burlap and white flowers were stick-on embellishments from the scrapbook section. With a coupon, it was worth it to buy it versus trying to make!

IMG_6654


The mantel! It's probably my favorite part of all of the updates. I kept two of my lanterns in place from the holidays. The window pane is a new addition, as well as the chalkboard - both from our local antique mall (mentioned above). I think the basics will be nice to have an update seasonally and layer as my mood changes.

IMG_6655


The chalkboard is a really fun addition, especially since I can change quotes, versus and song lyrics throughout the year.  I used a regular piece of chalk to write it on here, and started with Blessing in the center. Next, I added the first and last word to each line so I could evenly space it out. It's pretty easy to do as long as you plan your space allocation!

IMG_6656


Come Thou Fount is one of my favorite hymns of all times. I think the lyrics are absolutely beautiful. Seeing it here on the mantel has me singing the words all day long! Love it.

IMG_6657


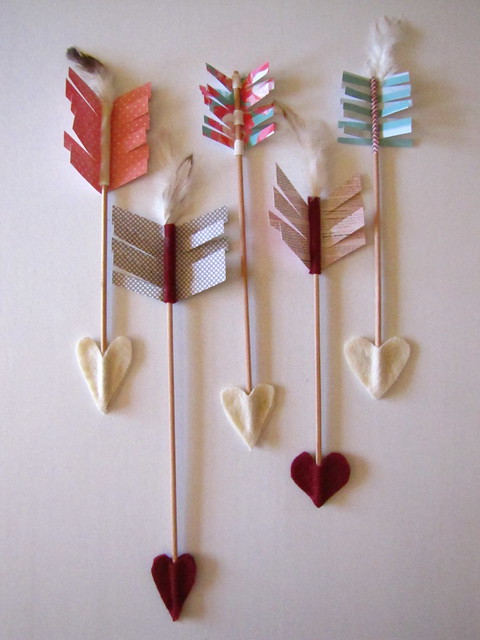
This was a fun little project! I made a few cupid arrows (tutorial below) and put them in a new little container I picked up from Michael's. 3 is my favorite number, so I had to have it. Why 3? Several reasons: 
- ".....a strand of 3 cords is not easily broken" - Ecclesiastes 4:12
-"....and now these three remain, faith hope and love..." - 1 Corinthians 13:13
-the Holy Trinity 
-3 wise men
-It takes 3 in a marriage (husband, wife and God)
-Good things come in threes
-3rd times a charm
-I met Keith in 2003...

....I could go on and on! :)

IMG_6660


To my ceramic pitcher, I added a few flower picks I had leftover from years past, but spruced them up with some MORE punched-out hearts! I tied them on with a mixture of baker's twine and ribbon.

IMG_6662


For color, I added a few of my favorite books and my favorite little Antropologie vase.

IMG_6664


This banner was a steal at the local antique mall! I could easily make something similar, but I knew it was worth it for the embroidery that had been done.

IMG_6665


On the kitchen table, I added a little nod to Valentine's Day on my white tray. The plaid runner is a Target buy from a couple of years ago and I primarily use it at Christmas, but it still goes! I stacked a few red plates up and tied some napkins together with grosgrain ribbon, and stuck on felt hearts (also cheapies in a bag from Michael's). I tried to keep functional items on the tray since our table isn't very big and we use it a lot!  Those little piggies are salt and pepper shakers.

IMG_6669


These bunnies are a favorite of mine. I'll keep them out all through spring! They came from a local gift shop.

IMG_6670


On the kitchen bar, I added a little dish with keys by my lamp. The keys were also from Michael's. I found them randomly on this aisle they have that always changes. It's like the Target One Spot equivalent for them. These were $1 a piece and each was different. Steal! Again, more punched out hearts. I kinda went crazy with that puncher, y'all.
Oh, and that Pink Magnolia candle from Tarjay is ahh-mazing.  Smells too good.

IMG_6672


It's the little things that make me smile, like switching out my soap, lotion and dish liquid by the sink. I swear by this stuff from Williams-Sonoma and I'm so thankful to have an outlet here in Memphis! The hand towels are a pair that I've had for so long I can't even begin to recall where they came from.....

IMG_6673


By the back door, I added a little tag flair here, too, as well as a couple of keys. Maybe I'll get a love letter and pin it up? 
{hint, hint, Keith Jones}

IMG_6674


Aren't those tags the cutest?

IMG_6675


Sidebar: I've said on the blog before that I'm behind on posting recipes. I have been cooking a lot, just not been keeping up with the posts. This is proof. It's a list written in full on front and back and folded in half of all of the things I need to post. I think what is stopping me is poor photos. So, I need to make them all again and snap better pics OR just move on with my life and post 'em anyway.


I hope you enjoyed the tour!! Now, here's how I made those cute little cupid arrows:

IMG_6699


What I used:

2 wooden dowels from Michael's, cut at various lengths
Felt
Scrapbook paper, varied
Feathers
Hot Glue


IMG_6701


Using a small piece of felt, I wrapped the tips, inserted a feather or two and hot glued it on the edge to seal. Next, I folded a piece of scrapbook paper and cut an angled rectangle. I glued the dowel into the center and then cut the paper in strips, bending some forward and some back.

IMG_6702


For the tip, I simply cut out felt hearts and hot glued to each other with the dowel in the center.

IMG_6698


I varied things up a bit as I went. This one is wrapped in some scrapbook trim in only 3 places and I didn't use a feather.

IMG_6697


I wrapped this one with some 'washi' or craft tape that was Chevron patterned (Michael's) and cut a piece of striped paper.

IMG_6690

The polka dot may be my favorite. Easy peasy!

In conclusion, I think it's probably a good thing I don't have too many 3 day weekends in the year or I would craft without stopping! Once I get going, I get so excited. Poor Keith, while he was watching NFL games on Sunday I kept interrupting to gush over the cuteness factor with him.  Ever the sweetheart, I got a lot of 'yeahhh, looks great, babe."

Let me know if you get inspired to do some of this fun stuff at your house!

PS - I'm linking up to Home Stories A to Z Tutorials and Tips, Today's Creative Blog, and Kelly's Korner!

Italian Meatball Sliders

| 1 responses. Leave a Comment!
Hi, hello! I am still playing blogging catch-up and may be for a while longer, but I'm always happy when I get the chance to make a post! This is a yummy, yummy recipe that I can't believe I haven't posted sooner. We LOVED the sliders and fought over who got to take the leftovers for lunch. It's another Cooking Light dish that has became an instant favorite. Below is the recipe with a few of our modifications. I served this with a spinach salad with mozzarella, red bell pepper and balsamic dressing.


Italian Meatball Sliders
click here for printer-friendly version

Ingredients:
1 Tbsp olive oil, divided
3 garlic cloves, minced
3 shallots, finely diced (or 1/4 cup chopped red onion)
1/3 cup part-skim ricotta cheese
1/4 cup chopped fresh parsley
1/4 cup panko
1/2 tsp freshly ground black pepper
1/4 tsp crushed red pepper
1/8 tsp salt
8 ounces lean ground pork or turkey (I used turkey)
2 (4-ounce) links turkey Italian sausage, casings removed
1 large egg
1 1/2 cups favorite marinara sauce 
12 slider buns, toasted
8 oz sliced fresh mozzarella
12 basil leaves

Heat 1 tsp oil in a large skillet over medium heat, swirl to coat. Add garlic and shallots to pan; saute 3 minutes or until shallots are softened, stirring frequently.

Combine shallot mixture, ricotta and next 8 ingredients (through egg) in a medium bowl. Shape mixture into 12 (1-inch) meatballs, flatten each meatball slightly.

Return pan to low-medium heat. Add remaining 2 tsp oil to pan. Add meatballs to pan; cook 6 minutes, turning once. Add marinara sauce, bring to a boil, scraping pan to loosen browned bits. Cover, reduce heat, and simmer 8 minutes of until meatballs are done.

Top bottom half of each bun with 1 1/2 tsp sauce, 1 slice fresh mozzarella, 1 meatball, 1 basil leaf and top with half of bun.

Enjoy this little delight!

Wine Friday & Sangria Recipe!

| 1 responses. Leave a Comment!
Wine Fridays are back! It's only been 4 months since I've posted one of these. But, it's not for a lack of wine consumption. Trust me! Our recycling bin is embarrassing. The good news is, I've got lots of good bottles of wine stored up on my list to share with you. One of my many 2013 resolutions is to return to ye ole blog and do a better job of keeping it updated. So, today, I've got a Wine Friday feature and a Sangria recipe. This is what we call in the South a twofer. Two fer one. Get excited.


wine fridays

Y'all know I'm a big fan of Food Network. So, when they recently started advertising their Entwine brand of wine, I became intrigued. But, I buy wine by the mixed case so I don't shop for it regularly. A case will last me a while since Keith doesn't usually partake with me! My favorite locally-owned wine shop in Downtown Memphis doesn't sell Entwine. But, on a recent quick trip to Walgreens, I spotted the brand and had to give it a try. Yes, my Walgreens has a full liquor store in it. I don't think that's a common thing, but I'm not complaining! Nothing like picking up your medical prescriptions and a bottle of liquid therapy. Hah!

Anyway, this bottle of Pinot Grigio impressed me and my fam so much that we went back for two more bottles the next day! And, we were not out of white wine. We just had to have more of this particular one! I would really encourage you to check this one out. Now I can't wait to try the other Entwine varietals.

pinot-grigio-2009

Entwine Pinot Grigio
Year: 2010
Origin: California
Average Price: $12.99 (totes affordable)
About the wine: The website for this wine describes it as crisp, refreshing and citrusy, like a green apple drizzled with lime juice and honey. I couldn't have said it better myself! We paired this with a cheese board and pears the first night, and enjoyed it with this honey gingered salmon with jasmine rice and steamed broccoli the next night. YUM!! This would go well with any Asian or Mexican dishes, as well as white fish. Oh, and it's won a bunch of awards, but hopefully I've bragged on it enough for you.


....You could also try the wine in this tasty Sangria recipe! I made this for Christmas Eve and it was so super simple, really pretty and tasty, too.


photo

Winter Sangria

Ingredients:
2 bottles of crisp white wine
1 bottle of sparkling apple cider
1 orange, sliced
1 red apple, sliced
1 cup fresh cranberries
1 handful of fresh mint leaves

Combine all ingredients together. If possible, allow to chill for 1 hour for flavors to blend.


Happy New Year & Happy Friday! Let me know if you try either of these.